I’m not normally known as the dominant type, but in my role as the Erotogeek, I’m going to make you do things you never believed you’d agree to. Believe me, it’s for your own good. And I promise it won’t hurt — much! This month we’re going to tackle the basic underpinnings of the World Wide Web.
As I argued in my last column, every author has to know something about the Internet. Even if you work with a traditional print publisher, you have to worry about your web site, your blog, your Goodreads, Shelfari, and Facebook pages, your Yahoo groups, and so on, ad nauseum. Whether you like it or not, promotion has moved to cyberspace. You have to adapt or die.
So, you need to know something about the mechanics of disseminating information on the Internet. I’m not suggesting that you should be creating your web site by yourself, from scratch. That’s a major effort. There are professionals to help with this task, not to mention lots of fancy tools. However, there are times when you need to do a little bit of web coding on your own. Your publisher is running a contest, and you have to add an image or a link to your website. You want to create an email signature. You want to do some quick and dirty modifications to a Yahoo group message or add some fancy formatting to a blog entry.
Every author, in my opinion, needs to know at least of bit of HTML, just to survive. This month, I’ll introduce you to some basics of web coding and hopefully, help to demystify the amazing but remarkably simple World Wide Web.
How the Web Works
The Web is much less complicated than you might imagine. Basically, the World Wide Web depends on two types of software programs, plus two languages or protocols.
The first kind of software is a web server. In the most straightforward case, a web server runs on the computer where your web page content is located. If you use a web hosting company, the web server runs on that company’s computers.
A web server receives requests from the second type of software, a web browser. Firefox, Safari, Opera, Chrome and Internet Explorer are common examples of web browsers. A web browser runs on a user’s computer and allows the user to get information from any web server that is connected to the Internet.
A web browser creates requests, which are sent to a web server. Which server? That depends on the URL (Universal Resource Locator) included in the request. The URL identifies not only the network address of the web server, but also what content on the web server is desired. For example, the URL http://www.lisabetsarai.com/news.html specifies that the server can be identified as www.lisabetsarai.com, and that the user wants content named news.html from this server.
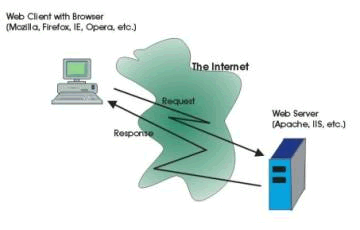 The language used to make requests is called Hypertext Transfer Protocol (HTTP). You don’t need to worry much about this language. However, it’s remarkably simple. There are only half a dozen possible commands in the HTTP language.
When a web server receives an HTTP request, it tries to create a response. If the URL specifies a particular item of content that is stored on the web server computer (e.g. the file named news.html), the web server will read that file and send its content across the network, back to the web browser. Normally the retrieved content will be expressed in a language called Hypertext Markup Language or HTML.
The main function of a web browser is to make requests, receive content expressed as HTML, and display that content in the web browser window. All Web browsers understand HTML and know how to follow its commands in order to display a nicely-formatted document. Thus, if you want to create your own content for your website, blog or social networking site, you need to know at least a little bit of HTML.
So What the Heck is HTML, Anyway?
HTML is an example of what is called a “markup language”. An HTML document includes the text or other information that you want to show on a web page, plus commands that tell the browser (in general terms) what to do with this content: how it should be displayed or what actions it should cause.
HTML markup commands are always enclosed in angle brackets (<>). For example, the markup command used to indicate the start of a paragraph is <p>.
Actually, most (but not all) HTML markup commands come in pairs. The first member of the pair indicates the start of some section to be treated in a particular way. The second member of the pair indicates the end of the section. For signaling a paragraph, the ending markup is </p>. In general, the ending command is the same as the starting command, with a forward slash after the opening angle bracket (the “less than” sign).
Some of the most common HTML commands are used simply to format text. For example, you can create section headings of various sizes using the markup <h1>…</h1>, <h2>…</h2>, and so on. The text of the heading replaces the …. The smaller the number, the larger the heading text. The subtitle of this section was coded in HTML as:
<h3>So What the Heck is HTML, Anyway?</h3>
Here are some other common text formatting markup commands:
| Markup | Effect |
|---|---|
<b>...</b> |
Makes the enclosed text bold |
<i>...</i> |
Makes the enclosed text italic |
<pre>...</pre> |
Encloses text that should not be formatted or paragraph-wrapped. The text will appear exactly as typed. |
<br> |
Causes a line break. Note that this markup does not have a corresponding end command. |
<hr> |
Displays a horizontal rule (a dividing line, often displayed as raised) |
<font size=+1>...</font> |
Makes the enclosed text be displayed in a larger font than “normal” |
<font color="red">...</font> |
Makes the enclosed text be displayed in red. |
The last two examples show another wrinkle concerning HTML markup. Many HTML command can include attributes that modify their normal behavior or appearance. If I wanted my heading, above, to be centered, I could add the attribute align, as follows:
<h3 align="center">So What the Heck is HTML, Anyway?</h3>
There are a few hundred HTML markup commands, but don’t worry about learning them all. You can look them up when you need them. HTML markup commands are often called “tags”. That’s what I will call them from now on.
Just remember that whatever tags you include in your HTML document will be interpreted by the browser and used to format the content of the document. You need to recognize that different browsers may produce somewhat different-looking displays from the same HTML document. There are some commands that are not standardized, which will only work in some browsers. However, there is a standard definition of HTML; if you start to write a significant amount of HTML, you should probably get yourself a book that covers the standard.
Images and Links
Formatting text is obviously important. After all, we’re writers – text is our primary tool. However, graphics and links are what make the Web so effective and attractive as a way to communicate.
Including a graphic image in a web page requires adding a single markup command, the <img> tag. This tag does not have a corresponding ending tag. Inside the tag, you must specify the src attribute to indicate what image should be displayed. For example, the HTML that I used to display the web architecture image above is as follows:
<img src="https://erotica-readers.com/images/WebArch1.gif" class="alignright" hspace="5" border="1" alt="Basic Web Architecture">
Most web browsers can display JPEG or GIF images. Some browsers can display other formats. Remember, though, that a typical computer screen and browser window may be as small as 1024 dots across (even smaller for smartphones and other special devices). You will often need to reduce the resolution of your images so that they will fit on the screen. We’ll talk about how to do that in a few months.
The <img> tag provides width and height attributes that will tell the browser to resize the image. However, the visual quality of the result is often poor.
There are many attributes that can be used with <img>. The ones that I used above define the location of the image in the browser window, allow the text of the article to wrap, and create a border around the image. The alt attribute defines a text string that will be displayed if the image cannot be found or if a user accesses the web page with a text-only browser.
What about links? Anyone who uses the web knows what a link (more correctly, a “hyperlink”) is: some text that you click on, which will cause the browser to take you to a different location. The new location (called the “link target”) can be a page on a different web site, another page on the current site, or even a different location on the same page.
So, to create a link, the first thing that you need to know is the URL of the page that should be displayed when someone clicks the link. There is a short cut method for specifying pages within the same site, but you can always use the full URL (see above).
Once you know the URL, you must decide what the text of the link should say. What text will the user click on? For example, if I have a link to my latest newsletter, “my latest newsletter” is the link text.
The tag to create a link is called the anchor tag, and is written as <a>. This tag has a required attribute, href, which indicates the target URL. The anchor tag also has an ending tag, </a>. In between the begin anchor and end anchor tags, you put the link text.
So, putting this all together, the code for the newsletter link above is:
<a href="http://www.lisabetsarai.com/news.html">my latest newsletter</a>
 What about combining a hyperlink and an image? How do you do that? It’s easy! Instead of putting link text between the begin anchor and end anchor, you put the appropriate img tag. So to create a link like this: you use the following HTML code:
<a href="http://www.eternalpress.biz/book.php?isbn=9781897559246">

 <img src="https://erotica-readers.com/images/RubysRules100x138.jpg" hspace="10" vspace="10" border="1" class="alignleft"></a>
This example demonstrates a very important feature of HTML. You will often need to nest one set of tags inside another. When you do, it is essential that the ending tags occur in the opposite order from the beginning tags, that is, that the inner markup is completely enclosed by the outer markup. If, for example, you want to make some text be both bold and italic, you could do so as follows:
<b><i>Some Text</i></b>
Note that you must end the italic before the bolding. If you put the ending tags in the wrong order, you may get some strange results. Some browsers might not even be able to display your page.
Lists
If you use a modern word processing program, you are probably accustomed to capabilities for automatic numbering and formatting of lists. These features are convenient since you can insert or rearrange list items without having to worry about manually revising the numbering.
HTML offers similar capabilities, though you don’t necessarily have as much detailed control over the appearance of the list. To create a list in HTML, you need to use two sets of tags, one to define the list itself, and another to define individual items on the list.
Here’s an excerpt from my To Do list, an example of a numbered list in HTML:
- Final line edits for “Quarantine”
- Interview questions to BDSM Books blog
- Prepare blog article for ERWA Blog, March 21
- Work on trailer for “Exposure”
- Write 4K on “Rajastani Moon”
- Submit review for Erotica Revealed
To code this example, I used two sets of tags. The tags <ol> and </ol> begin and end an ordered list. The tags <li> and </li> mark the start and finish of a list item. HTML automatically assigns numbers according to the order of the list items. So the code for the list above looks as follows:
<ol>

 <li>Final line edits for "Quarantine"</li>

 <li>Interview questions to BDSM Books blog</li>

 <li>Prepare blog article for ERWA blog, March 21</li>

 <li>Work on trailer for "Exposure"</li>

 <li>Write 4K on "Rajastani Moon"</li>

 <li>Submit review for Erotica Revealed</li>

 </ol>
Would you rather have your list items preceded by letters? You can control this using the type attribute with the <ol> tag. For instance, to change the list above to use lower case letters, I would begin it with
<ol type=”a”>:
- Final line edits for “Quarantine”
- Interview questions to BDSM Books blog
- Prepare blog article for ERWA Blog, March 21
- Work on trailer for “Exposure”
- Write 4K on “Rajastani Moon”
- Submit review for Erotica Revealed
Uppercase letters and other formats are also available.
Like most HTML constructions, lists can be nested (included) inside other lists. Thus, it is easy to create an outline, or a multiple choice poll:
- Who is the sexiest actor?
- Brad Pitt
- Hugh Jackman
- Clive Owen
- Michael Caine
- Who would you most like to have endorse your book?
- Oprah Winfrey
- Margaret Atwood
- Portia da Costa
- Salman Rushdie
<ol>

 <li>Who is the sexiest actor?</li>

 <ol type="a">

 <li>Brad Pitt</li>

 <li>Hugh Jackman</li>

 <li>Clive Owen</li>

 <li>Michael Caine</li>

 </ol>

 </li>

 <li>Who would you most like to have endorse your book?

 <ol type="a">

 <li>Oprah Winfrey</li>

 <li>Margaret Atwood</li>

 <li>Portia da Costa</li>

 <li>Salman Rushdie</li>

 </ol>

 </li>

 </ol>
I have indented to show the different levels of list; this is not required. Notice that the nested list does need to be completely inside the list element tags for the outer list. It’s quite easy to get confused; if you put the end tags in the wrong places, you can get some strange results.
In addition to ordered lists, HTML also provides “unordered lists”, which use the tags <ul> and </ul>.
For example:
- Sexy actors
- Brad Pitt
- Hugh Jackman
- Clive Owen
- Michael Caine
- Book endorsers
- Oprah Winfrey
- Margaret Atwood
- Portia da Costa
- Salman Rushdie
The HTML for this nested list is the same as for the numbered list example, except that I replaced <ol> and </ol> with <ul> and </ul>, and took out the type attribute. On my browser, at least, HTML automatically uses a different style of bullet for the nested list, which looks quite nice. I suspect that it is possible to control the style of bullets directly, but I’ve never tried.
Tables
Tables are an extremely powerful and useful construct in HTML. Obviously they can be used to present data in rows and columns, like the following simple (and fanciful!) example:
| Book | Jan Sales | Feb Sales | Mar Sales |
|---|---|---|---|
| Raw Silk | 12,040 | 15,231 | 22,765 |
| Incognito | 23,309 | 18,756 | 32,605 |
| Rough Caress | 17,652 | 20,121 | 22,811 |
| Ruby’s Rules | 26,122 | 39,100 | 41,615 |
However, tables can be used in other contexts, to organize both graphical and textual data. For instance, the array of book covers and commentary here is implemented as a table, as is the display of “Lisabet’s Friends and Colleagues” on my Links page.
There are many tags that can be used in creating tables, and each of them has a variety of possible attributes. However, to code a basic table, you need only four sets of tags:
<table> and </table> mark the beginning and the end of the table.
<tr> and </tr> mark the beginning and the end of a table row.
<th> and </th> are used inside a table row, to define column headers.
<td> and </td> are used inside a table row, to define normal table data.
Putting these four sets of tags together, we can create the dream book sales table shown above, with the following HTML code:
<table width="100%" cellpadding=5 border=5>

 <tr>

 <th>Book</th>

 <th>Jan Sales</th>

 <th>Feb Sales</th>

 <th>Mar Sales</th>

 </tr>

 <tr>

 <td>Raw Silk</td>

 <td>12,040</td>

 <td>15,231</td>

 <td>22,765</td>

 </tr>

 <tr>

 <td>Incognito</td>

 <td>23,309</td>

 <td>18,756</td>

 <td>32,605</td>

 </tr>

 <tr>

 <td>Rough Caress</td>

 <td>17,652</td>

 <td>20,121</td>

 <td>22,811</td>

 </tr>

 <tr>

 <td>Ruby's Rules</td>

 <td>26,122</td>

 <td>39,100</td>

 <td>41,615</td>

 </tr>

 </table>
Once again, I’ve used indenting to make the structure of this code clearer. Notice that the table description is purely hierarchical. Table rows are contained within the table tags. Table header or table data tags are contained within the table rows.
You might also notice that you do not need to explicitly tell the browser how many columns you want in your table (although you can). The maximum number of table data or table header tags in any table row will determine the number of columns for the table as a whole. If some rows have fewer table data cells than others, the table will look odd.
You can control many aspects of the table appearance using various attributes, including alignment of the table cell contents, width of the table columns, and thickness of the border, if any. You can also create table rows in which some of the data span multiple columns. I’ve inserted a spanning heading in the example below, just to demonstrate.
| Book | Q1 2008 Sales Figures | ||
|---|---|---|---|
| Jan Sales | Feb Sales | Mar Sales | |
| Raw Silk | 12,040 | 15,231 | 22,765 |
| Incognito | 23,309 | 18,756 | 32,605 |
| Rough Caress | 17,652 | 20,121 | 22,811 |
| Ruby’s Rules | 26,122 | 39,100 | 41,615 |
In this modified example, I added a new table row above the previous heading row, with the following code:
<tr><th>Book</th><th colspan=3>Q1 2008 Sales Figures</th></tr>
The colspan attribute makes the header extend over three columns.
The really powerful thing about tables is that the table cells (material between the <td> and </td> tags) can contain pretty much any HTML code. This means that you can embed an image inside a table cell (as I did on my books page), or a list, or even another table. The possibilities are pretty much limitless.
If you spend some time experimenting, you will find that you can create some very sophisticated information layouts using tables.
What’s Next?
I think that I’ll stop here. I don’t want to overwhelm you! However, HTML provides many more useful capabilities. There are image maps, for example, images with multiple sensitive areas that take you to different places. Of course, it is also possible to embed multimedia content such as a video or audio clip in a web page. HTML also provides tags that allow you to create forms for input, with text fields, drop down lists, push buttons and so on.
I’ll leave you with one last suggestion. If you are ever curious as to what the HTML for a web page looks like, you can find out. Most browsers have a View menu which includes an item called Page Source. If you select this menu item, the browser will open a new window and show you the HTML used to create the page.
Warning! For many web sites, you’ll find this to be totally incomprehensible! This is because many sites are created by tools which do not format the HTML to be easily read and understood by a human. (Also, some sites are generated by special programs running on the web server, rather than simply being a stored HTML document.) However, if you try View=>Page Source with this page, you should be able to see lots of examples of the points that I’ve made in this article.
Happy HTML coding! If you have questions, please get in touch. Just email me with the subject line “HTML 101”.
Lisabet Sarai
March 2012
“Naughty Bits: The Erotogeek’s Guide for the Technologically Challenged Author” © 2012 Lisabet Sarai. All rights reserved. Content may not be copied or used in whole or part without written permission from the author.