Editing Corner

Why Writing the Wrong Thing is Better Than Nothing

The thing that I have learned about writing is that even bad work is useful.

Because whether we agonize over our words or produce them explosively with a mind to go back later and assess the damage, odds are good that whatever we’ve written will either be excised or heavily retooled by by the time we get down to revision. In fact, the odds are good that the very lines I am writing at this very moment, will vanish in the final edit. Such is the nature of the beast.

But one of the few goods things about this beast is that it is much like the Island of the Dead from Pirates of the Caribbean. Cannot be found except by those who helped create it.

Nobody sees the rough drafts. The pages and pages and pages of ideas that don’t pan out. The directions we carve a path towards only to suddenly course correct for reasons we can’t properly explain. This beast belongs solely to the writer and neither looks, nor acts the same from story to story.

Because the funny thing that happens when you write something down, give it form and shape, is that by the end, you at the very least have something to show for it. Now, your beast might be misshapen, or crude, or downright ugly, but however it may look, it still belongs to you. And the hard part that comes when you’ve lived with it long enough, is that if you wait, if you listen to this beast, to the click of its claws and its guttural whispers, you find you’ve got something more.

You’ve got an idea of what the right thing to do is, what the story could look like, if you keep going. Now, this is not a road map, far from it. It’s barely even a compass. But it is a feeling, a pull in a certain direction that you were only able to find by going off in the wrong way. Because sometimes, when you’re not sure which way to go, the only thing you can do is pick a direction and see how it goes, for good or for ill.

Sometimes, if you’re anything like me, you start out with a great plan. Or at least a part of one. You know how a story begins and ends but you get lost somewhere in the middle. The details don’t match up, or change even as you’re writing them, and suddenly you’re lost.

All at once, you stop and you grouse. You moan and you whine. Maybe you even punch a tree (a terrible idea, I speak from experience. But then, after you’ve rested, and taken another look around, you realize that while you might not get to where you wanted to go, you can still get somewhere, even if it is far from where you expected.

Because in writing, unlike almost any other profession, it is only by doing the wrong thing that you figure out what the right thing to do is. And while I know that sounds cliché, like a quote emblazoned across one of those ridiculously expensive journals they sell in trendy bookstores, it is still the truth. And whether we gussy it up or say it plainly, we all need to hear it.

Especially on those nights when all we have is the beast, and no real idea of where we’re going.

Speech Tags, Quotation Marks, and the Meaning of Life

One of the downsides of being an editor is the inability to ignore other writers’ errors. I can be reading a thrilling erotic tale or a gripping mystery, only to be suddenly kicked out of the fictional world by a spelling, grammar or punctuation error.

(If only my own mistakes stood out so clearly!)

Anyway, in my recent reading I’ve encountered a number of authors who seem somewhat confused about how to capitalize and punctuate dialogue. While this isn’t as important as getting the grammar right (in my opinion), this sort of error can be distracting. So I thought I’d do a quick post reviewing the rules.

Speech Tags

In order to correctly punctuate dialogue, you need to understand speech tags. A speech tag is a phrase that includes a subject plus a verb related to speaking: “said”, “asked”, “exclaimed”, “commented”, and so on. The object of a sentence with a speech tag is the dialogue content itself. In many cases, the subject and speech verb can be in either order, and it’s possible, though less common, for the tag to come before the dialogue content.

“You’re the hottest little tramp who’s walked into my store in a week,” said Herve, rubbing his hands together.

“Where were you on the night of the thirty first?” Sergeant Morgan asked.

Martin Luther King said, “I have a dream.”

In dialogue, speech tags serve two distinct functions. Most importantly, they identify which participant in a conversation is associated with a particular utterance. Without speech tags, dialogue can become confusing, especially if there are more than two people talking.

As a secondary function, speech tags can also convey information about the manner of speaking:

“You’re nothing but a slut,” Martin shouted.

“Please, Master – let me come,” she whimpered.

There are many speech verbs that can be used this way: “whispered”, “whined”, “blurted”, and so on. They do double duty by identifying the speaker while also giving the reader some clues about his or her emotions or state of mind.

Be careful, though. Some verbs that might seem similar to my examples are not in fact speech verbs, but writers sometimes punctuate them as if there were. For instance, “laughed”, “whistled”, “smirked”, etc. do not specify speech acts.

Also, it’s often desirable to opt for simpler, less conspicuous speech verbs (like “said”) and use actual action verbs to convey manner.

“You’re nothing but a slut.” Martin slammed his palm down on the table.

But that’s another post…

Quotation Marks

When you want to record what a character said, in his or her exact words, you must surround those words with opening and closing quotes. If you’re writing in U.S. or Canadian English, you use double quotes; British English uses single quotes.

“I’m forever true to the Red, White and Blue,” Jenna swore.

‘Give me a pint of your best bitter, Jake,’ ordered Detective Smythe.

If you need to put a quote inside another quote, you use the opposite type of punctuation.

“Who was it that said ‘even bad sex is good sex’?” asked Jeremy.

Putting the Two Together

If you don’t use speech tags, life is simple. You put your characters’ words inside the appropriate style of quotation marks, using the same punctuation you’d use for a normal sentence: full stop for a statement, question mark for a question, exclamation mark for an exclamation, and so on.

“I’d sure like to see what you have on under that dress.”

“Can you give me a hint?”

“Hot damn! You’re one hell of a looker!”

Things start to get messy (and writers start to make mistakes) when speech tags come into play, either before or after the direct quote. I see cases like this:

*** WRONG ***

Maribelle whispered “Meet me at the gazebo in twenty minutes.”

*** WRONG ***

“Meet me at the gazebo in twenty minutes.” Whispered Maribelle.

*** WRONG ***

“I’d sure like to see what you have on under that dress.” said Howie with a leer.

The rules are actually simple.

1. If the speech tag comes before the quotation, put a comma after the speech verb, then include the quotation, punctuated as you’d expect if it were standing alone.

2. If the speech tag comes after the quotation:

  1. If the quotation is a question or exclamation, punctuate the quotation as if it were standing alone. Do not capitalize the next word after the quotation marks (unless it’s a proper noun).
  2. If the quotation is a statement, end with a comma rather than a full stop as you would if it were standing alone. Do not capitalize the next word after the quotation marks (unless it’s a proper noun).

Examples of Each Rule

Rule 1:

Her Master declared, “You’re mine, pet.”

The vampire whispered, “Wouldn’t you like to live forever?”

Rule 2a:

“Wouldn’t you like to live forever?” whispered the vampire.

“Get your hands off her!” the guard shouted.

Rule 2b:

“You’re mine, pet,” her Master declared.

“I got your letter,” said Joyce.

That’s it. Easy!

I hope this is helpful. If not, you might want to check out this link.

https://www.authorlearningcenter.com/writing/fiction/w/character-development/6491/8-essential-rules-for-punctuating-dialogue—article

However, they have a lot more rules than I do!

And feel free to ask questions in the comments.

Description: Getting It Just Right

When I sit down to write, I have pictures in my mind. I can see my setting, whether it is an exotic foreign temple, a seedy motel, or a trendy night club. I have some sense of my characters’ physical appearance. I imagine the action as it occurs, playing out like a movie in my mind. Most authors, I believe, have similar mental images.

Part of our task as writers is to communicate all these pictures to our readers. Description is essential in building a fictional world for our readers to inhabit. Description of the setting helps to establish a mood for the story as well as conveying factual information in order to set the scene. Description of a character allows readers to understand who the character is, why he or she reacts in particular ways or evokes desire, hate or fear from other characters. Effective description of action is essential in order to move the story forward along its plot arc.

Some authors might disagree, but I would argue that it’s nearly impossible to write a good story without some description. How much, though, is enough?

A common weakness in the work of novice writers is over-description. A story will begin with four paragraphs of text about the weather, the manor house, or the windswept Scottish moors. A character cannot show up on a page without having some adjectives or adverbs to drag around. A love scene explains in excruciating detail what the hero’s left hand and right hand are doing at each moment.

Why is this a problem? Because too much description can interfere with the progress of the story. Consider the following passage, adapted from a very early story of my own called “The Ambassadors to G79-3”.

She emerged first from stasis, a faint humming in her ears, a strange saltiness in her mouth and a sharp tingling in her secret parts remarkably like sexual excitement. Her eyes gradually focused on the luminous neon scope attached to the curved inner surface of her personal stasis chamber. The temporal-spatial coordinates displayed there were reassuringly familiar. The ship was right on course and the stasis mechanisms had functioned perfectly, awakening her a mere six hours from the destination.

She stretched her long limbs luxuriously, enjoying the soft, gentle pressure of the cushioning foam that lined the chamber. Lyrene fumbled a bit with the mechanical release latch, then swung the port wide and stepped clumsily into the cylindrical control room that formed the heart of their ship. Blue, green and gold lights blinked and flashed as the ship’s advanced biocerebral core rapidly calculated alternative landing trajectories and touch-down coordinates. The viewing dome in the middle of the floor glowed golden from the raging fires of the star G-79. Lyrene deftly flicked a switch, executing an 180 degree turn, and the dome revealed an endless field of deep blue spattered with flecks of silver, and a greenish egg shape hanging near the edge.

This is the start of the story. As any experienced writer will tell you, the first few paragraphs of a story or novel are critical. This is where you must “hook” readers, catch their interest, excite their curiosity, make them want to read on so that they can find out what happens next. In this case, though, I am two hundred words into the tale, and nothing has really happened. If I continue in this vein, I’m going to lose my readers’ attention.

Clearly, I need to set the scene. If I don’t manage to communicate the fact that this is a space ship, then the next paragraphs will not make any sense. However, I can streamline the entire opening, simply by cutting some the adjectives and adverbs, restructuring a few sentences, and omitting details that really are not important.

She emerged first from stasis, a humming in her ears, a saltiness in her mouth and a tingling like sexual excitement in her secret parts. The luminous scope inside her stasis chamber showed temporal-spatial coordinates that were reassuringly familiar. The ship was right on course. The stasis mechanisms had functioned perfectly, awakening her six hours before the scheduled landing.

Lyrene stretched her limbs, stiff after months of immobility, then crawled clumsily through the stasis chamber port into the cylindrical control room. Lights blinked and flashed as the ship’s brain calculated landing trajectories and touch-down coordinates. She requested an 180 degree turn. Instead of the fires of the star G-79, the viewing dome now revealed a field of deep blue spattered with flecks of silver, with a greenish egg shape hanging near the edge.

I have cut the passage by more than seventy five words. More importantly, I have focused the reader’s attention on Lyrene and her actions, instead of on what the ship looks like. One technique for doing this is to remove references to intermediate acts unless they are essential for understanding the scene. In the revised version, I dropped any mention of unfastening the latch or opening the port. Notice, however, that I did not remove the adverb “clumsily”. I felt that this was necessary to convey Lyrene’s physical state after the long space trip.

The passage above is hardly a model for great literature. However, it does set the scene better than the previous example, without holding up the story.

Another hazard in the realm of descriptions is over-describing your characters. Of course you want your readers to be able to visualize your hero and heroine. Leave some space, though, for the reader’s imagination. Sketch your character, highlight the critical aspects of their appearance or personality, but then let the reader’s personal preferences fill in the details.

Here’s another example, once again adapted from some of my unpublished work.

Why did she arouse me so strongly? She didn’t look the least bit tarty. Her beige skirt ended a modest distance below her knees. Her white crepe blouse draped her torso, suggesting rather than revealing the roundness underneath. The V of the neckline exposed the hollow of her throat, where I caught the discrete sparkle of some silvery charm. She had arranged her hair, a warm brown threaded with hints of red, into a neat chignon at the base of her neck. She was probably wearing make up, but it was subtle enough that it merely enhanced the overall impression: a beautiful, business-like young woman with a smile I might be willing to die for.

How tall is this woman? What color are her eyes? How old is she? Is she Caucasian or some other ethnicity? Is she slender or voluptuous? What size bra cup does she wear? Forgive me for the last question, but I have read far too many beginner’s stories where the author apparently viewed this this item of information as essential. ;^)

Each of you, reading this paragraph, will have a somewhat different image of the woman being described. I have not provided any of the above details of her appearance, because they are not important to the story. What is important is the narrator’s impression: that she’s “neat”, “business-like”, “discrete”, “subtle”, “modest”. (As it turns out, this character is not at all what she seems, but rather is a sexually ravenous dominant.)

Lawrence Schimmel, the celebrated gay author, has compared writing to creating a radio play. In the days of radio, the entire family would sit around the “wireless”, listening to comedies or dramas. The voices would evoke different pictures for each listener. The playwright’s job was to suggest, to hint, to guide the imagination.

I don’t have space in this article to consider the question of over-description in action, which can also be a problem. However, I would like to leave you with a few suggestions for improving your descriptions.

1. Make each adjective and adverb count. Some writing gurus advise eliminating all adverbs and most adjectives. I think this is just plain silly. However, before you write about a “blue chair”, consider whether the blueness really matters for your story. Be selective.

2. Avoid starting a story with pure description. There’s a risk that you’ll lose your readers’ attention before you get to the action.

3. Keep the focus on the characters and the events of the plot. Interleave description with action.

4. When in doubt, cut. Don’t hold on to descriptive passages just because they paint a beautiful picture.

In writing, despite what some people may say, there are no hard and fast rules. You need to discover what works for you. Personally, I’ve found that applying the suggestions above help me turn overblown, wordy descriptions into more effective passages that support rather than interfere with the action.

Raising the Dead: Clickbait

Last time on Raising the Dead, we talked about your self-published stories that have just…ahem, gone to sleep. Tanked. Carked it. Better euphemisms come to mind, but Monty Python used them all in The Parrot Sketch (“’E fucking snuffed it!”) Specifically, we talked about Phase 1 of Reanimating Literary Corpses: Sexing up your Title and Keywords (also colloquially known as Hung Alien Jocks Drill Astro-Cheerleaders, though perhaps only to me).

If you’ve already read Phase 1 and applied those learnings to your dead or dying erotica, your title is now so sexy it smoulders, and your keyword game is tighter than an Icelandic nun. Should you expect to instantly start selling more books?

You already knew the answer to that, and it’s “not necessarily”. Making your eBook discoverable is just the first step in the journey. Now that you’re in a reader’s search results, what you need is for them to click.

Erotica that just Clicks

How do you choose fruit at the grocer? Do you look first at the sticker to see what variety of apple it is (Gala, Pink Lady, Fuji)? Do you look first at the price?

How about clothing? Do you look first at the label to see what fabric it is? Do you first try every outfit on to see which is most comfortable?

These are all important considerations, but they happen after the click. The click means you’re interested. The click means you might buy this product. At the grocer, the click happens when you pick up the apple. At the boutique, it happens when you touch the garment. Your focus switches from the endless variety of products that surround you to the one specific product in your hand.

In the eBook store, this focus shift happens when you click the mouse. People look, they like, then they click. They don’t look at the words though; they look at the pictures. Apples must look delicious. Dresses must look stylish/attractive.

eBook erotica must look sexy.

This is a very roundabout way of stating a simple truth: erotica is sexy. No sexy means no click. No click means no sale. If your smut’s not selling, ask yourself—is your cover sexy enough?

Define Sexy

Not everyone is going to agree with me on this. Not everybody wants a sexy slut or a well-hung hunk posing on their eBook. Some people like thought-provoking covers. Some people like minimalist covers. Some people actively look for the cover that stands out from the pack—the one that takes the road less travelled.

And they’re right. That does happen. It’s just that more people choose a sexy cover. If you don’t believe me, here’s a link to Amazon’s Erotica Top 50. Yes, there are a small number of non-sexy covers. You too might strike it lucky and sell smut without a sexy cover, be my guest, but if you want to play the numbers, stick with sexy.

So, pick a cover with a sexy model. Right?

No.

No. No. No. I can’t stress this enough. A sexy model and a sexy cover are two very different things. The biggest and easiest mistake to make is to choose a cover that is merely relevant, but not sexy. The book is about phone sex, so you pick a beautiful woman—nay, a sexy woman—holding a phone. Hear that sound? It’s your book dying. It doesn’t count that the woman is beautiful. It doesn’t even count that she’s sexy. She needs to be actively sexy. She needs to be doing something sexy. Ideally, she needs to look like she’s mere seconds away from doing something that would be considered pornographic.

Look through stock photos and mark the ones that make you feel aroused (watch out for nudity—you don’t want to be censored). I bet they’re active. I bet something is happening in the photo—or about to happen. It’s not just an image of stuff; it’s a moment from an active scene that has a very happy ending. This is the type of cover photo you want on your eBook.

Yes, your cover needs to be relevant. Don’t put a MILF on a sorority romp short. Don’t put a flat-chested waif on a BBW romance. It’s easy to over-think cover selection though—trying to find a model who looks just like your main character, hunting for elements mentioned in the story—buyers do NOT care. Remember, all you’re looking for is one click.

It’s a very simple test. If you don’t find the photo arousing—and I don’t care how perfectly, cleverly, satisfyingly relevant it is to your title—then walk away.

Actively Sexy. Got it. Anything else?

I’m tempted to say no. If you can nail an actively sexy cover, you’re nine-tenths of the way done with your erotica cover. There are still ways to screw it up with terrible cropping, futzing up the colours, using an awful font or indiscriminable text, but no amount of photoshopping is going to save you if you’ve picked the wrong image.

If you’re buying your cover or hiring a cover artist, you’re just about done. Those guys should have the skill to compose a good cover around the right image, just find and show them some stock photos that you find arousing. They can use them for inspiration. This was how we put together the cover for ERWA’s ménage erotica anthology, Twisted Sheets. We started with an idea—a near naked woman with hands all over her—and collected a bunch of sample photos for our divinely talented cover artist, Willsin Rowe. Willsin didn’t use any of those photos, but what he came up with was better even than we imagined. It was actively sexy.

If you’re doing your own cover, here are a few tips:

  • If you don’t have Photoshop, download Gimp. It’s free. It is hard to learn, but very much worth it. If you start with an easier program, you’ll top out on the features early, and then to get to the next level you’ll have to start at ground zero with Gimp or Photoshop.
  • Learn about layers and layer masks. They are critical to Gimp success.
  • Learn how to adjust brightness and contrast. There are advanced techniques that make the colours in the image pop without yellowing skin tones. Look for tutorials on YouTube.
  • Use a drop-shadow to make text more discriminable. Learn how to use gradients behind text if it’s getting lost in the image.
  • For square-ish or landscape photos, learn how to blend the edges of the photo into a background.
  • Crop the photo tight around the model. Don’t be afraid to chop off body parts, even heads, to get more skin in shot. I think it was Churchill once said, “You don’t look at the mantle when you’re stoking the fire.”

Now go get yourself some Sexy

Title and keywords make you discoverable.

An actively sexy cover makes you clickable.

Are we done with Raising the Dead? Ha! You know we’re not. Now you need to close the sale. But that’s a topic for another blog. For now, go get yourself some sexy and see if your numbers pick up.

I’ve got one hand in my pocket…

…and the other one is playing a piano.

Alanis Morissette gets beaten up a lot over her 1995 hit, Ironic, which lists several ironic things (like a black fly in your Chardonnay, or the good advice that you just didn’t take) which just… well, aren’t. Ironic, that is. I’m going to give Alanis a pass on Ironic, though. (She’ll be pleased to hear that, no doubt). She nailed the one about the guy who was afraid to fly and died in a plane crash, and a few others were pretty close. That’s good enough for me.

Where we come to blows, though, is in another song from the same Jagged Little Pill album called Hand in My Pocket. Let’s check some more of those lyrics:

And what it all comes down to my friends, yeah

Is that everything is just fine, fine, fine

‘Cause I’ve got one hand in my pocket

And the other one is hailing a taxi cab

I don’t think everything is going to be fine, fine, fine.

“Hop in, lady. Where ya goin?”

“I’m sorry, I don’t want a cab.”

“Well why’d ya’ hail me down?”

I didn’t hail you, it was my hand.”

“Crazy bitch.” The cab’s tires squeal as it peels away from the curb.

Do you see my problem? Alanis’s hand was acting autonomously. Right now all it’s doing is playing pianos and hailing taxis, but before long it’ll be pulling puppy dog tails and tripping grannies, and mark my words, all hell’s gonna break loose.

Autonomous Body Parts

You might say I’m being pedantic (“Belinda, you’re being pedantic”), but this lyric and the one about playing a piano never sat well with me, and that was long before I learned about Autonomous Body Parts in fiction.

It just sounds wrong. Hands don’t play the piano, people do, and it sounds weird when you attribute those actions to a body part.

What does this have to with erotica?

In erotica and erotic romance, we talk about body parts and their myriad delectable actions a lot. Kissing, licking, stroking, fingering, spanking, fisting—our body parts get busy, my friends, and we’re not always completely in control. We’re wont to see a lot of involuntary or reflexive actions, such as:

Her lower lip trembled.

Her pupils dilated.

His cock bucked and throbbed and exploded inside her.

And these are all fine. We would never say, ‘She trembled her lower lip.’

Indeed, it’s the conscious actions we need to watch out for.

Brittany’s hand reached for his cock.

His fingers clutched at her ample ass.

Her lips kissed his turgid member.

Sorry about that last one. I can’t bring myself to put prose that purple into my stories, so this blog is my only outlet. On their own, you might not notice one of these rogue body parts, but our erotic writings don’t contain single, isolated actions—they contain lots of them, strung together pages on end. Put three or more of these together and people will notice.

I haven’t got it all figured out just yet

Voluntary, involuntary, autonomous…I’m confused. How can I tell when it’s okay to attribute an action to a body part?

Brittany’s back arched, and with a piercing scream, she came.

Should this be, ‘Brittany arched her back’? If she’s in the throes of orgasm, is it involuntary, or is she doing it deliberately to increase the pressure on her clit? God, this is so hard! (said the nun to the vicar)

Brittany blinked.

Blinking is involuntary! Should that be ‘Brittany’s eyes blinked?’ And how about this one?

Todd’s tongue slid into her mouth.

We can be pretty sure that Todd’s tongue wasn’t acting alone, here, but the alternative, (Todd slid his tongue into her mouth), whilst not wrong, is not an improvement. In fact, the original for all three of these cases sounds just fine.

It can depend on the verb. Every verb has a subject—the person or thing performing the action. In the case of Autonomous Body Parts, the subject is a thing—Todd’s tongue, Brittany’s hand—but for the non-autonomous version, the subject is a person—Todd, Brittany.

Here’s a useful trick: try using the verb in both a ‘who’ and a ‘what’ question to discover the subject.

  1. Who slid?
  2. What slid?

If the sliding was happening on a ski slope, then option 1 would work fine, but we’re talking about tongues, so ‘what slid?’ is the more meaningful question, suggesting it’s okay for the tongue to be the subject when ‘slid’ is the verb.

What happens when we change the verb to ‘licked’?

Todd’s tongue licked between Brittany’s supple folds.

Well, let’s ask it as a question.

  1. Who licked?
  2. What licked?

In this case, both might seem plausible at first, but look more closely. If you were given an obviously pre-licked ice cream, would you ask who licked it, or what licked it? So, when it comes to licking, the subject of the sentence should ideally be the individual who owns the tongue, not the tongue itself.

Let’s go back to our first example.

Brittany’s back arched, and with a piercing scream, she came.

  1. Who arched?
  2. What arched?

Both seem to work. This suggests there are edge cases and they’re not uncommon. If you come across an edge case in your writing, use your gut, and perhaps fall back on the voluntary versus involuntary sub-rule above.

Everything is gonna be quite alright

Whichever way those edge cases go, most people won’t notice and pedants like me will cut you some slack. The important thing is you’re finding the obvious ones which are more common and far more overt: kissed, licked, blinked, nuzzled, reached, stroked, fingered, touched—if you want your prose to sound in any way erotic, these all demand a human actor.

Or a tentacled alien. I’m not judging, just don’t make it an autonomous body part.

What’s all this “show, don’t tell” stuff about?

Ian Smith, ERWA Flasher Gallery Editor

Having a twice-daily commute of around fifty minutes, I’m in the habit of listening to audiobooks. I think I listen to more books than I read.

Given my other options of (a) road noise, (b) talking to myself, (c) overly-enthusiastic breakfast show presenters, or (d) politicians trying not to answer questions, audiobooks are a pleasant default choice.

Assuming the narrator works for me, of course, but that’s a different matter.

I recently listened to Audible’s Sherlock Holmes: The Definitive Collection, very nicely narrated by Stephen Fry, which runs for almost 72 hours. Four novels and five collections of short stories, with personal introductions by Mr Fry, a life-long Holmes enthusiast.

I’d never read any Sherlock Holmes, so I was curious to see what they were like.

All but one were written in the first person from Watson’s point of view, supposedly describing their escapades years after the events, reconstructed from memories, notes and records kept at the time. The other was written in the first person from Holme’s point of view.

Among the things which struck me was the way the stories reflect some of the changes in society over the time-span covered by the books, such as telegrams being replaced by telephones.

But most writers will know what I mean when I say that what struck me very clearly was that these stories can be described as “tell, don’t show”.

The earlier ones in particular seemed to follow this pattern:
1) someone turns up and presents them with a puzzle;
2) Holmes rushes off to solve it, leaving Watson to amuse himself;
3) Holmes returns to Baker Street and explains it all to Watson.

Although this approach results in snappy short stories, I didn’t exactly find them engaging.

Inevitably, there’s no shortage of books written (at least in part) to make money for authors telling other authors how to “show, don’t tell”. Attributed to Chekov, the idea was popularised by Percy Lubbock in his 1921 book The Craft of Fiction, which drew both criticism and praise from established writers.

I think the wikipedia entry for “Show, don’t tell” explains it rather well:
“Show, don’t tell is a technique used in various kinds of texts to allow the reader to experience the story through action, words, thoughts, senses, and feelings rather than through the author’s exposition, summarization, and description. It avoids adjectives describing the author’s analysis, but instead describes the scene in such a way that the reader can draw his or her own conclusions.”

Of course, Conan Doyle wrote the Sherlock Holmes stories around a century ago, when writing styles were rather different. Although it’s a long while since I read HG Wells, I recall War of the Worlds and The Time Machine were rather heavy on the narrative story-telling and light on insights into the characters’ experiences.

I think Emma Darwin, in her thisitchofwriting blog, has captured the idea nicely:

SHOWING is for making the reader FEEL they’re in there: feel as in smell, touch, see, hear, believe the actual experience of the characters. … we persuade the reader to read the story we’re telling AS IF it really happened, even though we all know it didn’t. That means working with the immediate physical and emotional actions and experience of the characters: your rage beating in your ears, the wind whipping your cheeks, a beggar clutching at your coat.

TELLING is for covering the ground, when you need to, as a narrator … It’s supplying information: the storyteller saying “Once upon a time”, or “A volunteer army was gathered together”, … it’s a little more removed from the immediate experience of the moment.

Here’s a single example:

Telling
The parties were dazzling and opulent. They spilled out of the house, into the garden and even the beach.

Showing
In his blue gardens men and girls came and went like moths among the whisperings and the champagne and the stars. … The last swimmers have come in from the beach now and are dressing up-stairs; the cars from New York are parked five deep in the drive … floating rounds of cocktails permeate the garden outside … the lights grow brighter as the earth lurches away from the sun, and now the orchestra is playing yellow cocktail music, and the opera of voices pitches a key higher.

Now, which one works better for you as a reader? The factual one, or the more colourful and descriptive one?

No points for guessing which one F Scott Fitzgerald used to describe the parties in The Great Gatsby.

I believe Hemingway was notable for his “show don’t tell” style, but I must admit I’ve not read any of his work. One of my mild rebellious tendencies is to avoid anything people tell me I “must” do.

The style relies on the reader being able to imagine the character’s experience. If the writer can get it right, they don’t need to include all the nitty-gritty details, as the reader will readily fill in the gaps using their own imagination.

I’ve only posted one review on Amazon for a book I didn’t actually finish. It’s also the worst review I’ve posted, and the headline was:
“The title is the best thing about this story. Interesting enough story idea, poorly written.”

No, I won’t share the title here… but feel free to ask privately.

The book is nominally 327 pages, but I only managed two chapters. There was one line of dialogue in those two chapters, short and wooden. The bits I read were all tell and no show. Straight “tell”, with no effort to even describe what the characters were thinking. As far as I could tell, the blurb summarised the entire storyline, so I had a good idea of what I missed out on.

Obviously, we can mix “show and tell” in our writing in a way to help us tell our story. Sometimes an infodump or a section of narrative keeps things ticking along, keeping your reader’s attention until the next scene, incident or event. But you can always use a character to help “show” your fictional world in science fiction, fantasy, or even historical stories, by persuading the reader to see this world through the character’s senses.

In the end, it’s something you can use in your writing as much or as little as you want.

It’s your story, after all.

Even today, this approach has its critics. In 2017, Cecilia Tan argued in Uncanny Magazine that the common writing advice to “show, don’t tell” is both a cliché and an inherently colonialist idea.

Or, if you enjoy an entertaining conspiracy theory, you might like to think about the suggestion that “show, don’t tell” was propaganda funded by the CIA during the Cold War.

Like all these writing rules, “show don’t tell” has its place.

You want to tell your story as well as possible, after all.

Stop SHOUTING with Style

I received a plaintive cry for editing help from our esteemed ERWA Editor in Chief, Sam Thorne, the other day.

Hello oh wonderful soul of lasting genius1

I wondered if you knew how to search for words that were all caps and change them to lower-case italics, using the find-replace function.

(1 That, my friends, is how you suck up)

The problem for an editor is pretty clear: we are editing a manuscript that over-uses CAPS for exclamations, which is poor form, and seek to re-cast the emphasis with … well, emphasis. Specifically, lower-case italics.

For example:

“For the hundredth time,” cried Tom, “I’M NOT FUCKING SHOUTING!”

Would become:

“For the hundredth time,” cried Tom, “I’m not fucking shouting!”

How hard could it be, right? Well, here’s the thing—I’ve spent more time than is healthy mucking about with features in Microsoft Word, and I’m no stranger to the finer points of the Find-Replace dialogue box—but changing case in Word? Man, that’s a tough one.

With the benefit of a mis-spent youth recording and tweaking Office macros, I knew this problem was bog-simple to solve in a Visual Basic macro. To that end, I wrote Sam a quickie macro and flung it off back to the mother country, but then just yesterday while I was scrying for blog ideas, it came to me—maybe it CAN be done with Find-Replace. Well, part of it, anyway. Read on; you’ll see.

Like any good overly-complicated solution, while it’s ugly to look at, it comprises some individual techniques that are really quite beautiful—ones I will definitely keep in my arsenal for solving other problems—and I thought it might be instructive to share the joy.

If you’re the impatient sort, skip to the bottom and watch the video demo. 

Disclaimer: I’m using Microsoft Office 2016. Your version may look different.


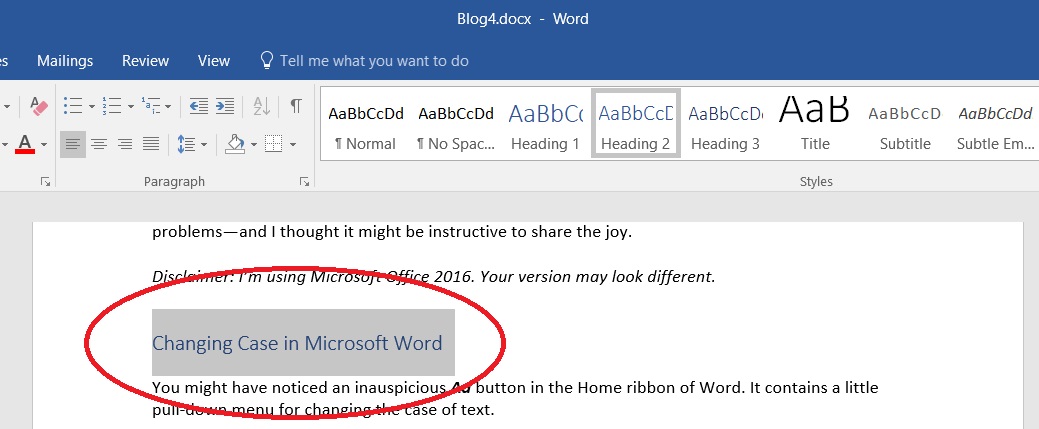
Changing Case in Microsoft Word

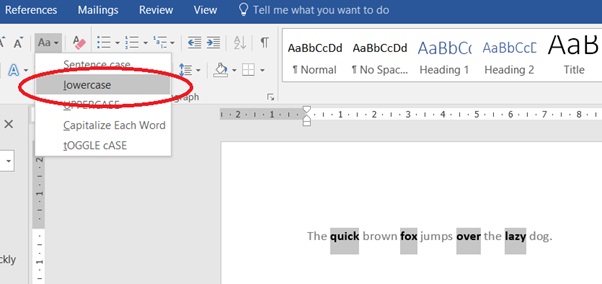
You might have noticed an inauspicious Aa button in the Home ribbon of Word. It contains a little pull-down menu for changing the case of text.

Problem solved? Not quite; Sam’s manuscript contains LOTS of shouting in LOTS of different places. Highlighting every instance and clicking lowercase is the labour-intensive process she’s trying to avoid.

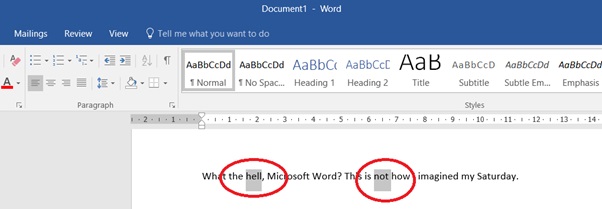
Clearly, we can’t convert the entire document to lowercase. That Sentence case looks interesting, though. What if we convert the entire document to sentence case? Unfortunately, it only seems to apply changes if the first word of a sentence needs correction, otherwise it changes nothing. Here’s some sample I text I played with:

Original:

What the HELL, Microsoft Word? This is NOT how I imagined my Saturday.

Lowercase:

what the hell, microsoft word? this is not how i imagined my saturday.

Sentence case:

What the HELL, Microsoft Word? This is NOT how I imagined my Saturday.

Lowercase, then Sentence case:

What the hell, microsoft word? This is not how i imagined my saturday.


That last one was close, but it ruined the proper nouns like Microsoft Word, and Saturday.

Trying to manipulate the entire manuscript isn’t going to work. We need a way to focus only on those uppercase words.

We can do this manually by holding down Ctrl and highlighting all the words we want to manipulate.

Gives us:

And since those converted words are still highlighted, we can convert them to italic in a single click.

It’s not a solution, as such, but it’s progress. Now, if only there was a way to select/highlight all the uppercase words.


Finding Patterns with Wildcards and Advanced Find

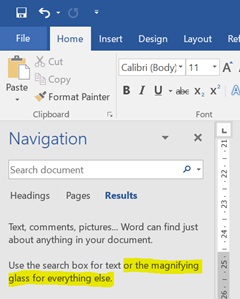
How do you find stuff in Word? Do you hit Ctrl-F? Or do you use the magnifying-glass Find command on the Home ribbon?

BZZZT! Novice—or as gamers would say—You filthy CASUAL!!!

Find will pop up the Navigation window in the left sidebar, which is fine if you’re looking for some very specific text, but it’s not exactly feature-rich. When you’re seriously editing, this is like bringing a knife to a gun-fight, aspirin to a crack-den, edible underwear to a dinner party…

You get the idea.

When you want to find something tricky, like for instance something in all upper or lower case, you’re going to need something a bit more capable.

Enter the Find-Replace dialogue.

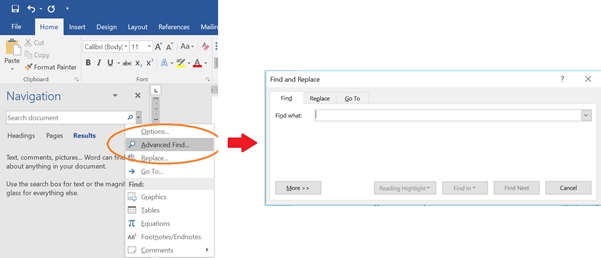
You can get there from the Find sidebar by clicking Advanced Find off the pull-down menu.

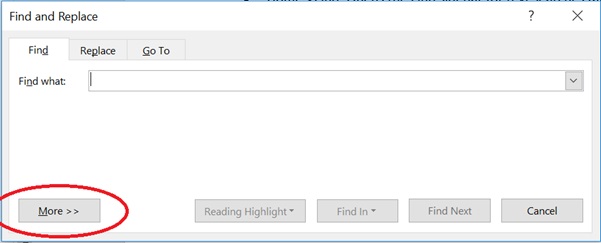
You can also get there with Ctrl-H, but that pops up to the Replace tab of the dialogue by default. Let’s take a closer look at that Advanced Find tab.


Doesn’t look too advanced, does it? Well, no—not until we click the More>> button.


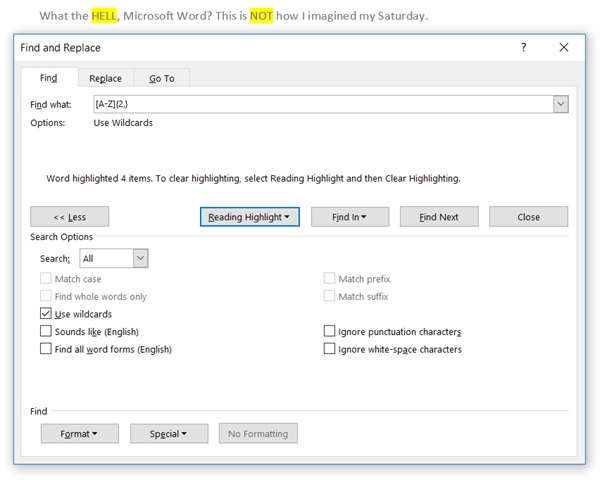
There are a lot of fun-sounding features here, but the one we’ll be using is Use wildcards. I’ll leave the rest to your curiosity.

If you’ve heard of wildcards before, you might be thinking of the asterisk, meaning “match any sequence of characters”. For example, a search for the wildcard SLEEP* will find SLEEPY, SLEEPER, SLEEPLESSNESS, and even SLEEP.

The Advanced Find wildcard does indeed support the asterisk wildcard, but it does much, much more—way too many to mention here. Since I’m only interested in finding words in all-caps, I’m only going to explain two of the wildcards (or, as they’re known technically, Regular Expressions):

  • [xy] – Matches a single character in the range from x to y in alphanumeric order. Eg. [A-Z] matches a single uppercase character.
  • {n,} – Matches the previous Regular Expression n or more times.

In this way, the Wildcard search:

[A-Z]{2,}

will find any string of two or more capital letters. Let’s try it out.

Nice. Notice how it doesn’t match the single caps character “I”?

This isn’t perfect—it won’t capture some edge cases where a single character is orphaned by punctuation (e.g. I’M, F.B.I., O’CONNOR, TOM’S, ISN’T). This is easily fixed with a more complex expression, but I won’t go into a detailed description. Suffice to say it handles embedded punctuation.

<[A-Z][!a-z]@>

It seems like we’re almost done. Now all the all-caps are highlighted, surely we just his up that Aa button and convert them to lowercase, right?

Wrong. Although we managed to highlight them, they are not selected as far as Word is concerned. If we try hitting Aa, we’ll just change the case of whatever words we had selected prior to the Advanced Find.

What about Advanced Replace? I hear you ask. It’s no help either. We can do a lot with Replace—apply fonts, highlighting, paragraph spacing, even styles, but we can’t convert to lowercase.

It seems like we’ve hit a dead-end. We need a way to progress from finding the all-caps words to selecting them in order to then convert the case and italics.


Select All using Styles

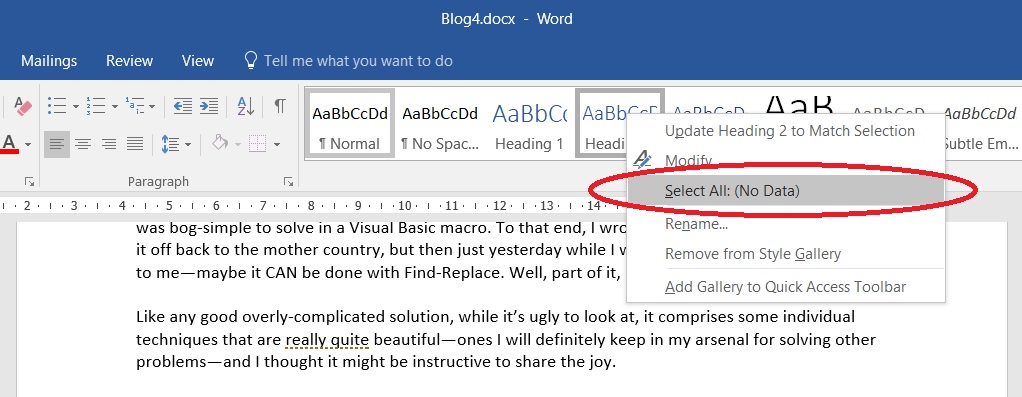
Fortunately, there is a tricky work-around—there is one way to bulk-select all text of a particular type by using Styles. Try this: pick out a Style that you have examples of in your document, and right-click it in the Style Selector in the ribbon.

See that Select All option? Click it.

Word will select all examples of that Style in the document. Once selected, you can make all kinds of bulk changes, like formatting, deleting, changing style, and of course, changing case.

If only we had a way to apply a special style to those all-caps words we found.

Hopefully you’ve connected the dots by now. “But what about the Replace function?” you ask. “Can we use it to find the caps, apply a style, and then use Select-All to snaffle them all up and convert to lowercase?”

You betcha! And here it comes.


Find Text and Apply a Style

Using the Find-Replace dialog again:

  • Ctrl-H to open Replace dialogue.
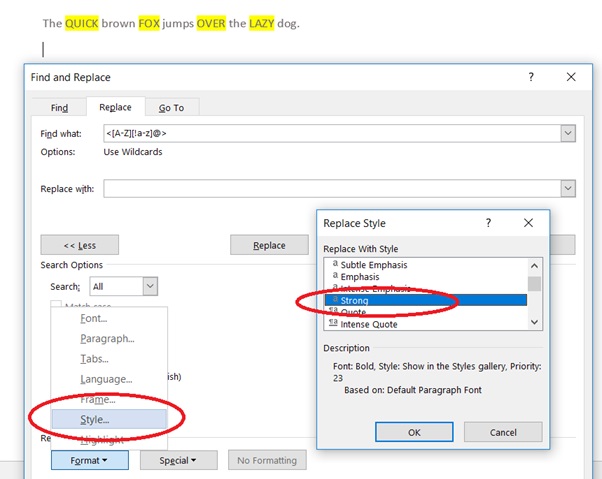
  • Find what: <[A-Z][!a-z]@> (finds all-caps words of two or more characters)
  • Replace with: (leave blank—open the Format->Style button and choose a Style you have not used elsewhere in the document, such as “Strong”)

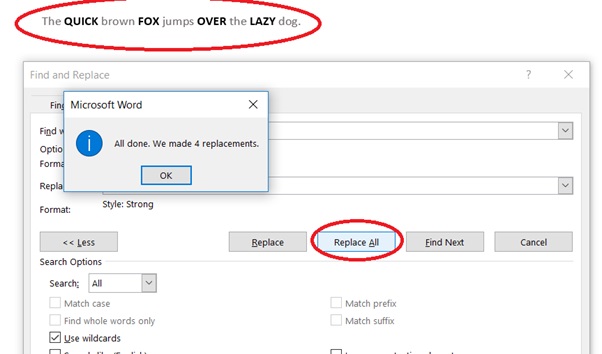
  • Hit Replace All

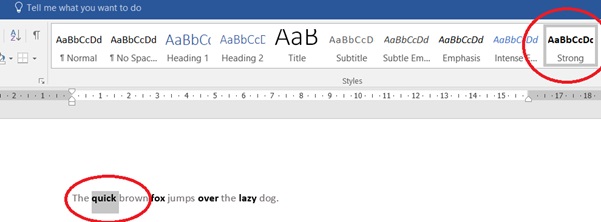
Obviously, we’re only halfway there. The caps words are still caps; they’re bold as well, of course, because we chose the “strong” style, which is a bolded style. We could equally have made our own custom style that didn’t change the font style, but the bolded text makes it easier to see that it worked, so I like it.

Now, to convert to lowercase:

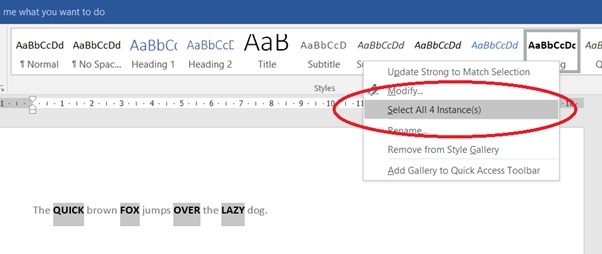
  • Right-click the Strong style and Select All

  • Use the Aa button to convert to lowercase, or even better, Sentence case.

  • Optionally use the Italic button to convert to italics (this is what Sam wanted instead of caps to emphasise the shouting).

Fantastic! We’re done.

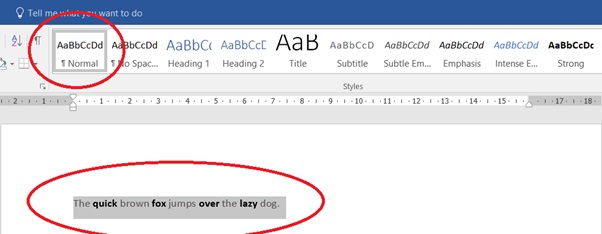
Or are we? The words are lowercase now, but they’re still bolded. That’s because they still have the Strong style applied. We have one last step to complete.


Stripping a Text Style

If we click on one of those bolded words, we’ll see the Strong style highlighted in the ribbon.


Whereas if we click on the paragraph as a whole, it will still have the default style of the paragraph (usually “Normal”).

Microsoft Word calls these Text Styles and Paragraph Styles respectively. The Paragraph Style defines the font, size, colour, etc for the entire paragraph, but it can be overridden for selected sections of text using a Text Style.

We can strip the Text Style, returning the converted words to the paragraph style.

  • Right-click the Strong style and Select All Instances to highlight all your converted text.
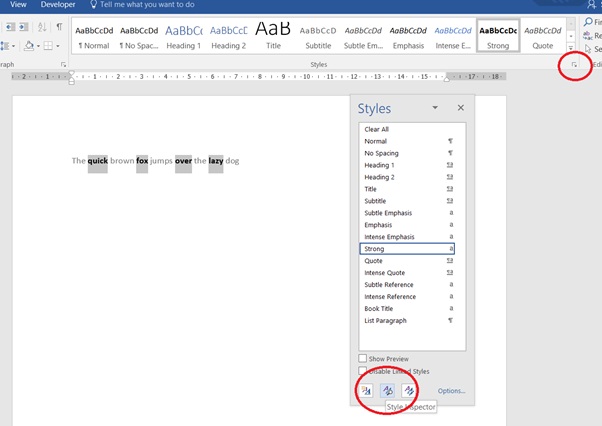
  • Pull down the Styles toolbox using the small arrow in the corner of the Style selector in the Home ribbon. Make sure the Strong style is highlighted.

  • Open the Style Inspector dialogue by clicking the middle of the three buttons at the bottom of the Styles toolbox (the one with a magnifying glass).

This dialogue shows the Paragraph Style and the Text Style of the selected text.

  • Now click the eraser button next to the Strong style name in the third box. It will return the highlighted text to the default Paragraph Style, removing the bold highlight from the text.
  • Note that if you had added italics above, this will appear in the fourth box, but will be conveniently preserved by the removal of the Text Style.


Summary

That’s it! You’re done. All your uppercase words are now lowercase (or Sentence case, if that’s what you clicked). Those steps again:

  • Use Advanced find to identify all CAPS words (Wildcard find: <[A-Z][!a-z]@>)
  • Use Replace to apply a style not used elsewhere in the document (eg. Strong)
  • Highlight all examples of the Strong style using the Style selector
  • Convert to Sentence Case
  • Optionally convert to italics
  • Strip the Text Style using the Style Investigator

More of a visual person? That’s okay, here’s a video demonstration.

Happy editing.

Let’s Get On With The Action

Ian Smith

ERWA Flasher Gallery Editor

  Pretty well every story has action scenes.

  Action scenes as in action and adventure stories?

  Well, yes, obviously. But I meant action scenes in their most general sense. Scenes in which the characters do things the writer needs to describe to the reader.

  It could be as simple as picking up a pen, or taking a sip from a drink. Or it could be a rather more complex act, like engaging in fisticuffs, enjoying an amorous engagement, or piloting a space craft which defies the laws of physics through a ludicrously busy asteroid belt.

  Think of a scene from a TV drama or a movie. How often do the actors just stand still and talk? They’re usually doing other things, even if that’s only sitting around a table. They might move around while sitting in a chair, turn towards each other, pull faces, pause for a second or two in a conversation. The actors show you more of the story with these actions than their words alone do. Hopefully, it makes the scene more believable to viewers, too.

  Actions can also help flesh out a character. A tough guy handling a weapon will seem rather more menacing than one just talking. And your readers already know about that weapon if you want to liven things up for your characters a little later.

  In an ideal world, your description of the action will include enough detail to convince your reader that the character did it (or is doing it, if you write in the present tense). It’s one of the times when “show not tell” can really work, even if it’s harder to write. You may have done some top-notch research, but think carefully. You don’t want to bog the story down, or tempt your reader to skip a bit, or worst of all, decide they’ve something else to read which will be far more lively.

  For simple things, you can use sneaky little “action tags” to describe what your characters are doing and show who’s talking. These may save you from the dreaded overuse of “said”…

  Inspector Jones pulled out a notebook and pen. “What did you see?”

  Sophie looked away. “Whatever.”

  Gregory turned to his computer. “Let’s see what the CCTV recordings show.”

  Where a scene requires more detail, you’ll have to rely on a more conventional mixture of narrative and dialogue to show the action unfolding.

  When thinking about a scene I want to write, I often try to imagine I’m watching it, as if it were a scene in a TV drama. Then I try to figure out the “choreography”.

  Choreography?

  I mean what happens, who does what, when, how, and with which hand or foot, and so on. Then there’s clothing, furniture, other people and objects around them.

  Once I’ve got all this straight (or straight-ish), then I’ll try to describe it in writing. And usually realise I need to think about it a bit more…

  One thing I’ve come across not infrequently in romance and erotica are confusing descriptions of what the characters are doing.

  Examples:

  • If there are two women involved, which “she” or “her” does the writer mean?
  • If a couple are getting amorous while sitting in a booth in a diner, how much could they do without removing the table? Likewise cars and steering wheels, or the cramped seats in a typical passenger aircraft.
  • A guy cuddling a woman only has one hand free, and that has a limited range of movement.

  In any action scene, there’s obviously a balance to be struck between details and the big picture, and keeping the scene moving is an obvious way to go.

  One approach I’ve come across for dramatic action scenes is for the character or narrator to be quite matter-of-fact. Len Deighton and Lawrence Block narrate their violence in such a way. Admittedly, with Deighton, it’s more plausible and realistic.

  One thing you might find helpful is to remember that unless your character has been very carefully trained, anything sudden and dramatic will be pretty confusing and they’ll probably notice specific details far more clearly than the whole scene.

  I’ve read two books which described conventional action scenes in quite different ways. Actually, they were both audiobooks.

  Incidentally, if you’re wondering if audiobooks might be a new outlet for your fiction, you may be right. I feel that while the right narrator can really bring a book to life, the wrong one can totally ruin it. I found Rosario Dawson’s performance of Andy Weir’s “Artemis” utterly entrancing. And after getting wound up enough to shout at my car audio system, I’ll avoid anything narrated by the British actor Martin Jarvis like the plague.

  Back to my examples…

  One was a period story I will refrain from naming. It attempted to be light-hearted and jolly, and the writer appeared to be trying to use a style which “felt” 19th century. There was a particular scene where the main female character was the cause of a major punch-up between two gangs, one protecting her from the other. Despite the furious action, the writer described this character picking her way between the combatants in an almost leisurely fashion, as if the fighting around her was in slow motion. I very nearly gave up on it, but I didn’t have another audiobook to listen to at the time.

  The other was “Stay Cool” by Elmore Leonard. There’s a point in the story where the main character is having some difficulties with two lots of gangsters simultaneously. With each unaware of the other’s existence, he manages to engineer them into a well-populated shoot-out in a nightclub, with him right in the middle of it.

  So how did Mr Leonard show us this scene of death and mayhem?

  The character told his girlfriend about it afterwards.

  As first person dialogue, we only had what he chose to relate, and only from his point of view. Like almost any witness giving a statement to the police, he’d be an unreliable narrator. Let’s face it, a noisy, dirty fight like that is going to be really confusing and you’d really want to keep your head well down.

  So, say your character is riding a horse, flying an aircraft, driving a tank, involved in a high-speed car chase, parachuting, firing a bow and arrow, or a firearm, fighting, fencing, wearing armour… Not all at the same time, obviously. How can you make your more lively action scenes more engaging and believable to your readers? Or get them to imagine that’s how it feels?

  Research.

  If you know of other people with suitable experiences, you could talk to them, read their accounts in books, watch interviews on TV, and so on.

  Or you could find out for yourself.

  Have a go at horse-riding, sailing, power-boating, flying, or driving a tank or fast car. Join a paintball game and find out how confusing a multi-party shoot-out can be. A fencing coach, martial arts or self-defence teacher can give you some pointers and hands-on experience. Archery or gun clubs may well let you shoot holes in targets (safely).

  So, think about what you want your characters to do, find someone willing to let you do something similar (at a reasonable cost, ideally), and go off and have some fun. Then you can use your experience to help convince the reader that your character’s doing it.

  The action, not the fun.

  Unless they’re having fun too, of course…

Editing Corner: That’s not a Romance

In my last blog, I talked (okay, blogged) about the difference between a scene and a story—a critical difference if we seek to elevate our erotica above the merely erotic, to make it both satisfying and memorable. It talked about all the ingredients I collect for a story, like a main character, an antagonist, conflict and resolution.

‘Ingredients’ is a good word for these things, because it tells us what we need to get started, but not how to put it all together. For example, you wouldn’t introduce your bad-guy in the last chapter, right? Even when you have all the right ingredients, you still need to put them together properly to get a story.

Structure: A recipe for success

Ever heard of the three-act structure? It’s not new. It was coined by Aristotle, apparently, and is now a staple of modern screenplays. We can employ the same techniques to structure stories, even short ones. Rather than boring you with a long and dull description that I copied off Wikipedia, I thought it would be more fun (for me) to show structure in action by decomposing a well-known story (in this case, a movie) into some of its structural components to show you how it works.

Now it’s no secret that I’m Australian, and it’s also no secret that every last one of us is a knife-toting, crocodile-wrestling maniac. It should come as no surprise that I have chosen the 1986 classic Aussie rom-com, Crocodile Dundee, starring Paul ‘Hoges’ Hogan and Linda Kozlowski. I know you’ve all seen it; don’t try to deny it.

So let’s have at it. Since I’m too lazy to actually describe the three-act structure, I’ll refer as I go along to some excellent infographics from www.helpingwritersbecomeauthors.com by K.M. Weiland, author of Structuring Your Novel.

The Story

Here’s a cinematic blurb for Crocodile Dundee that I pasted together from a few sources:

Sue Charlton, a New York reporter, heads to Australia to interview the living legend Mick Dundee. When she finally locates him, she is so taken with him that she brings him back with her to New York. How will the Aussie bushman cope in the big city? And how will Mick cope when he finds himself falling in love with Sue?

Now, this is my third go at writing this blog, and what I’ve discovered in two failed attempts is that breaking down the plot of even a simple movie like Crocodile Dundee into its three-act components is a monumental undertaking. I wouldn’t finish writing it, and you certainly wouldn’t finish reading it. I’m just not that interesting. Instead, I’ll try something briefer and hopefully more interesting, by pulling some of the key scenes out from Act One and trying to identify them in the Weiland infographic.

Scene: The Walkabout Creek Pub

It’s the third scene of the movie, where Sue accompanies Walter Reilly to the Walkabout Creek Pub to meet Mick. Mick sweeps in in a boisterous, raucous rush of hilarious larrikinism, wrestling a stuffed crocodile, when he spots Sue.

https://www.youtube.com/watch?v=3dv3v2if3WQ

They lock eyes and there’s a long, sexually charged moment that lets every viewer know exactly why they’re there—to see these two fall in love. This is a critical moment for the movie, because not only does it introduce the title character, it lets us know his goal (get the girl), and it is the pursuit of that goal which drives the drama.

In a romance story, a scene like this is known as a meet-cute (or sometimes cute-meet), a cute, amusing, and endearing way for the love-interests to meet. Woe be to she who writes a romance without a meet-cute.

Sue, to her great credit, steadfastly sticks to her purpose and is not wooed by the charismatic bushman:

“Listen, you do understand I want you to take me out where you were attacked, show me how you survived.”

“Oh well, I don’t know, just the two of us there alone? I’ve got me reputation to think about.”

This is our first sniff of the movie’s central conflict: Mick wants the girl, but the girl wants the story (not to mention, she has a boyfriend). In this way, the story’s antagonist isn’t a bad guy, or a monster, or a volcano, it’s situational. If Sue wants the story, she must spend time alone with Mick, and in doing so, she will have to endure his country charms. Surely only the strongest woman could resist!

Let’s look at K.M.Weiland’s Act One infographic. That link should popup a new window. I’d love to duplicate the infographic here, but I’m too damn lazy to ask Ms Weiland for permission. If you’re too damn lazy to click the link (hey, I’m the last to judge), then you’ll just have to imagine a timeline that shows how Act One is broken up into The Hook, The Set-up, The Inciting Event, The Build-up, and The First Plot Point. Curious yet? Clickety-click … I’ll wait … 

You’re back? Great. Now this infographic isn’t romance-specific, so we don’t see meet-cute there, but clearly the Walkabout Pub scene is part of the set-up; characters: check; goals: check; stakes: check.

But what about that Inciting Event? It’s supposed to be in here somewhere.  It will be the place where the antagonist takes its first bite out our main characters. The Walkabout Creek Pub introduces the situational antagonist, but it hasn’t slapped either of them down, yet.

Lesson: Not all critical scenes are on the right-hand-side of the infographic.

Scene: Sue Strikes out alone

After a day and night of outback adventure, Sue is recording her impressions on a tape recorder when Mick interrupts. (Apologies to US viewers, this link is blocked to you and I can’t find the scene elsewhere on the Internet)

https://www.youtube.com/watch?v=Pl8rwEuPf84#t=25m15s (Apologies to US viewers, this link is blocked to you and I can’t find the scene elsewhere on the Internet)

“Yeah, but you’re not alone. I’m here, aren’t I?”

“Yeah, but… I think I know how you must have felt… Or how I’d feel if I were out here alone.”

“You… Out here alone? That’s a joke. A city girl like you… You wouldn’t last five minutes, love. This is man’s country out here.”

“That’s right. I’m only a sheila. We’re heading for that escarpment today, right?”

“Yeah.”

“Okay. See you there this afternoon.”

You’ll have to watch the clip, because what the dialogue doesn’t show is the death-stare Sue gives Mick when he says she wouldn’t last five minutes.

This is our antagonist, out to play, teeth bared, saliva dripping from its maw. How could these two ever love each other? Physical attraction is one thing, but love between a chauvinist and a feminist? Not going to happen.

I think we’ve found our inciting incident. Their differences have driven a wedge between them, and it’s going to take a miracle to bridge the chasm it’s created.

Lesson: An Inciting Event is key to any complete story, not just a romance. We set a character onto a goal, but where’s the fun if we just let him succeed? Mick Dundee taking the city girl out into the bush, falling in love and living happily ever after is NOT a story. The Hook may be the thing that gets us reading, but the Inciting Event is the thing that makes us care.

Scene: Echo Lake

After the Inciting Event comes a series of scenes where Mick regains ground in his romantic quest for Sue, not the least of which being the one where he saves her from a crocodile attack.

Each of these plays on the same theme, Sue’s conflicted feelings for Mick, and the sense of safety she enjoys to be protected by such a manly man.

These feelings come to a head at Echo Lake. Sue is resting on the bank and watching Mick spear-fishing. The look in her eyes and the backing score all say one thing: she wants this man. Problem is, Wally will be there soon to end their adventure, and then she’ll have to go back to New York alone and resume her normal life without Mick.

https://www.youtube.com/watch?v=Pl8rwEuPf84#t=38m12s (Apologies to US viewers, this link is blocked to you and I can’t find the scene elsewhere on the Internet)

“Mick. When I go back, why don’t you come with me?”

“What for?”

“Well, it would make a great wrap to the story… You in New York City.”

“Oh. For a minute there I thought you were making a pass at me.”

“Well, I might have been. Would you mind?”

This is a huge moment for Sue. She’s tried playing the assertive modern woman to Mick, and it almost got her killed. But even though she’s the one making the move, everything in the scene still screams that she is playing submissive Jane to his Tarzan, which is the drama that drives their romance.

More importantly, it opens the plot of the movie. We’ve had the city-girl-in-the-outback, now it’s time for the bushman-in-the-big-smoke, which—apart from the romance—is the real point of Crocodile Dundee.

Looking at our infographic, we see that this is our First Plot Point. We’ve had the set-up and the build-up, now it’s time to crank the handle and let the story fly into the second act, which is where all the real conflict happens.

Lesson: The Inciting Event is not the plot; it simply opens up the story for the plot reveal. Because of this amazing thing that happened (Inciting Event), now we must embark on this adventure (First Plot Point). The closer you can tie these two to cause and effect, the more compelling the drama.

What Have We Learned?

Crocodile Dundee is cheesy and formulaic, and yet every time it comes on TV (and in Australia, that’s a lot, and usually late at night), there I am:

I’ll just watch to the croc attack.

I’ll just watch to Echo Lake.

I’ll just watch to “That’s not a knife.”

The reason I keep watching until they land in each-other’s arms in the New York subway, is because it’s a tremendously satisfying story. And it’s tremendously satisfying because it keeps giving you what you need, when you need it.

This is no accident.

Sure, you could ignore structure. You don’t want to write formulaic fiction that ticks boxes, you want to write a beautiful, organic story the way it needs to be told.

Well sure, you can. Don’t let me tell you different. But if your goals are less lofty, if all you want is to turn a good idea into a great story that people will enjoy, then look into this structure thing. It really works.

Slipping in the humour…

By Sam Thorne, ERWA Editor

As an
editor, the strangest request I’ve ever had from a prospective author was ‘can
you make this funny, please?’

That’s all
they wanted (other than a proof of the existing story). This chap had sent his
85k words of beautifully-composed gloom to a publisher who loved the story and
the premise, but wanted him to lighten things up in parts so that the true
gloom glowed. Yes, I know that sounds like a total contradiction.

I have to
admit—it was the most intimidating job I’ve ever taken on. Black humour takes
many forms so there were plenty of tools to apply to the job, but returning
this supposedly FUNNY manuscript to the writer gave me separation anxiety. Pressing
‘send’ from my gmail account was akin to wobbling my way onto a stage on
stand-up night and hoping I didn’t squeak into the microphone. Happily, the
author loved the little touches added to his MS, but as it transpired, he was
given a publication offer from an editor who was a fan of his original grim and
loveless offering. That’s not meant as an insult, incidentally—it’s how he
described his own writing (with pride!)

That was
many years ago. Since then, I’ve spent a lot of time reading books about how to
write comedy (none of which were particularly helpful), and looking
forensically at the forms of humour across a range of novels, coffee-table
collections, and TV programmes. This is not a hilarious business, I can tell
you. To paraphrase Jimmy Carr (co-author of the fantastic book ‘The Naked Jape’),
examining a joke or script is like dissecting a frog; by the time you’ve got to
the bottom of what made it tick—note the past tense—nobody’s laughing and the
frog has died.

So, before I
get into the meat of this article, I’d like to post a disclaimer. You are
unlikely to titter, guffaw, or snigger at any point. I’m just talking about tools you can use.

The most
intimidating aspect of creating humour is that humour is totally subjective. Of course it is. Whether or not your witticisms will elicit a grin in your reader depends on a few
factors:

  • Their life
    experience and prejudices
  • Their mood
  • Their
    natural tendency towards schadenfreude (the laughter reaction at someone else’s
    expense) vs their preference for kindness
  • Their sense
    of enjoying the ridiculous.

Different
people are tickled by different things, so it may help, as a starting point, to
associate different types of humour with different beasts:

The elephant

The elephant
is king of the farce. It’s situational humour brought about by characters with
entirely conflicting goals. Most sitcoms largely fit into this category. But
wait! Some sitcoms are considered to be lacking in substance, while others give
the impression of being up-beat and edgy. Why? Because the situations depicted
are those that the audience strongly relate to, which brings us to…

The owl

The owl is
the wise one, who’s seen everything and has the worldly knowledge. People
grinning at an episode of ‘Modern Family’ quite often do so because of the distinct
feeling of connection. The owl has been there, done that, and worn the tee shirt.
The owl is all about observational humour. The owl is the representative for a
huge branch of stand-up comedy. Yet, even if the situations discussed in a
monologue have the potential to make you laugh, whether you do so or not
depends on the delivery. Not everyone enjoys an observation which is harsh or
close to the knuckle. Which brings me to…

The snake

The snake is
the overlord of deliberately cutting humour. Schadenfreude belongs here, as
does the razor-sharp quip, clever word-play and black humour. The snake represents
one-liners, the put-down you wish you’d used while engaged in an argument. Stand-up
comedians with an abrasive edge belong here.

Primary
enjoyment of snake humour doesn’t mean you have a dark soul—perhaps you simply effective
sarcasm, or a twist on a cliché: I don’t
have much shame; I have to ration it.

The bat

The bat is
the creature of the zany. Think groan-humour. Think total surreality or
incongruity. Monty Python’s sketches (and The Holy Grail) largely belong in
this category, as does Airplane, the Naked Gun series, and so on. Stand-up
comedians who fire off a hundred puns in ten minutes fall into this category. If
the majority of your chuckles are generated from bat humour, then you have a
very strong sense of the ridiculous.

Classifying
humour sources in this way goes a long way to showing whyhumour is so subjective, and why some comedy series or films do
better than others—because they combine the beasts so well. Breaking Bad has a
situational concept (elephant), with a strong snake edge. Blackadder (which
remains one of the most successful British series of all time) combines all
four. I’m sure you can think of a few stand-up comedians who blend owl and
snake to perfect effect.

Hopefully
all this provides a framework for understanding what tickles you, and why. You
might want to keep this guide at hand for a few weeks while you’re reading or
watching films or TV. Get to know your
sense of humour. Make friends with it. Hell, give it a name, even.

So, in terms
of conveying your sense of fun on the page, what tools do you have? Within
dialogue, you have quite a selection:

* understatement (most prevalent in Brit,
Aussie or NZ humour)

* sarcasm and exaggeration (good for
snake or bat humour, depending on tone).

* indignation (arises naturally from
elephant humour, empathy deriving from owl humour).

Humour within
dialogue works best when your characters have very conflicting goals. This in
itself will guide the intonation in your characters’ speech, doing half the job
for you. If you’ve heard a good one-liner you want to use, build your scene around it. Create the context in which this is said. In constructing
a scene where you want your characters’ banter to work well:

  • keep dialogue tags to a minimum. The faster the conversational flow, the better.
  • let the punctuation
    create intonation and tone of voice as far as possible.
  • Play it
    straight. Have your MC laugh at other characters’ lines by all means, but limit
    the number of times that another character falls about laughing at your MC’s
    wit. If that’s going to happen, let the
    reader do it
    . However, if your MC gets into a pickle, there’s no problem
    with other characters having a laugh at their expense.
  • If you’re
    writing omnisciently, or writing memoir-style in the first person, you can get
    away with a far more visible narrator. In which case, you can apply the principle
    of contrast to your speech tags:

“He’d look wonderful in a harness.”

“Or a headlock,” I offered, marching
away before Stella could give me the be-nice-to-Dan speech. 

Some of the most
memorable and effective comic moments come from the laugh generated by
surprise. Without actively trying to be funny or consciously writing
lively banter, you’ll find that you’ll get a lot of mileage out of the concept
of incongruity. It’s hands-down the
easiest tool to use to create that note of levity in your work, whether you’re simply
to lighten the mood after a tense scene, or creating a bit-part personality to
bring the best (or worst) out of your main character.

The trick is
to present a very strange situation or personality with a totally straight face. The incongruity principle covers diversions from the expected such as:

  • an unexpected
    foe: like the hard man who’s reduced to impotent, furious, tooth-grinding
    compliance by his formidable four-foot-tall grandmother. The foe could be
    internal, too. Imagine being a real estate agent with claustrophobia. It’s not
    good if you have to ask your clients to walk themselves around the property…
  • a
    stereotype smashed to pieces: like the nonagenarian who’s hysterical at the thought
    of going into a nursing home because they might not let him take his X-box. Or perhaps
    the bloke who’s really shy at work but who gets arrested for public indecency…
  • an incongruous
    partnership: this is where the best bromances are born. The reader should be
    intrigued to find what two such totally different people could possibly have in
    common. Perhaps the brutish, widowed, aloof personal trainer develops a soft
    spot for the teacher at his son’s school, who’s about half his size and a
    nervous wreck. However, they bond in mutual indignation when someone parks in the
    disabled space…

So – how to
use all this information?

  1.  Write down things that annoy you. Groups
    of people who annoy you. Can you get any mileage out of making them opponents
    to your characters? Even if only as part of a scene to bring out your main
    character’s timidity / wit / annoyance / eloquence / indignant speechlessness?
  2.  Conversely, if a friend makes you crack up
    laughing, think what you were talking about. A situation? A mutual acquaintance
    struggling with a situation? Did they crack an awesome one-liner? If so, borrow
    semi-shamelessly (in other words, ask first).

Yes, humour
is subjective. It’s dependent upon delivery, context, timing and audience. But once
you’re on speaking terms with your own funny bone, your inspiration for
creating grin-worthy prose will increase tenfold.

Hot Chilli Erotica

Hot Chilli Erotica

Categories

Babysitting the Baumgartners - The Movie
From Adam & Eve - Based on the Book by New York Times Bestselling Authors Selena Kitt

Categories

Archives

Pin It on Pinterest